One microcomputer connected to an external hard drive providing wireless access to data, looking after torrents, and supplying aircraft information - all at the same time.
Tutorial below is written for ordinary folks, in plain English, with as much spoonfeeding as possible, contains own purchases, product samples and affiliate links (disclaimer). All links open in new window, tap / click images for full screen, prices are given in dollars, more or less the same in euros.
Subscribe on twitter at rtlsdr4everyone or via blue button top left of page to get notified.
Update February 7, 2018: Added more information on components and removed unnecessary command - thanks for feedback!
Update February 7, 2018: Added more information on components and removed unnecessary command - thanks for feedback!
What?
Complete system looks like this, not larger than your palm:

Raspberry Pi 3: microcomputer, does the heavy lifting.
Network Attached Storage: external hard drive connected to home wireless network, stores files, pictures, videos, accessible from a computer, smartphone or tablet on the same network. Some WiFi modems have an USB port for external drives, same end result. Personal data backup without cloud costs, anyone?
Torrentbox: share files with the world, also called peer-to-peer sharing.
ADS-B: get aircraft data for less than $10.
Do as much as you want, adding torrent capabilities or ADS-B is cream and cherry on the cake. Or the other way round, if already running an ADS-B station, more functions out of the same Pi 3 is just a few lines of code away.
Budget around $70 for a full Raspberry Pi 3 Kit, options for data storage below, a generic RTL-SDR dongle for ADS-B is yours for less than $10, but even the best bundles are less than $30.
Worth it? A ready-made 2TB Network attached storage is around $140; a full Pi 3 Kit and a 2TB external hard drive is about the same cash, but you can simply do more and end up with more equipment with a Pi 3 based setup.
Time required is less than one hour; mainly depends on Internet connection speed. Even if totally new to Raspberry Pi 3 / Linux, full operational capabilities can be reached in an evening by following this guide and simply copy-pasting commands.
How much?
Budget around $70 for a full Raspberry Pi 3 Kit, options for data storage below, a generic RTL-SDR dongle for ADS-B is yours for less than $10, but even the best bundles are less than $30.
Worth it? A ready-made 2TB Network attached storage is around $140; a full Pi 3 Kit and a 2TB external hard drive is about the same cash, but you can simply do more and end up with more equipment with a Pi 3 based setup.
Time required is less than one hour; mainly depends on Internet connection speed. Even if totally new to Raspberry Pi 3 / Linux, full operational capabilities can be reached in an evening by following this guide and simply copy-pasting commands.
Shopping list - Hardware
Amazon shopping note: equipment might be significantly cheaper or only available to a Prime member, subscription costs around $10 per month, can be cancelled after 30 days, do the math, saved $10 after subscription cost when bought two 64GB Sandisk Ultras versus normal Amazon price.
Raspberry Pi 3: required board only is around $37 but needs accessories to function, a microUSB card and reader, plus a power supply and Internet cable (officially called Ethernet cable) as minimum.
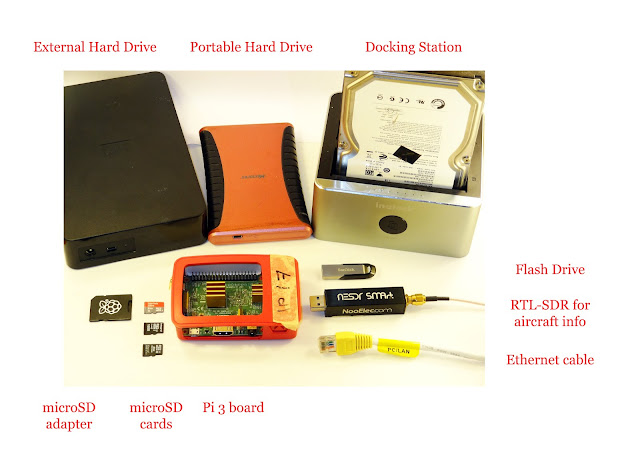
The whole nine yards in image below, pick what you need, bits n pieces discussed later on:
![]()
Newbie best overall choice, and the one I recommend is a ModMyPi Starter Kit for around $70 plus shipping, review here. I also bought a Vilros Raspberry Pi 3 Complete Starter Kit ($70 + shipping), which might come out cheaper if in the USA, excellent value with 32GB card, but no Ethernet cable.
The whole nine yards in image below, pick what you need, bits n pieces discussed later on:
Newbie best overall choice, and the one I recommend is a ModMyPi Starter Kit for around $70 plus shipping, review here. I also bought a Vilros Raspberry Pi 3 Complete Starter Kit ($70 + shipping), which might come out cheaper if in the USA, excellent value with 32GB card, but no Ethernet cable.
Storage: reliability is number one, choice depends on how much data you got, over Terabyte levels my vote goes for Western Digital external drives and hard drives as not one failed in the last 25 years, thought some swear by Seagate.
If looking for volume, buying anew, a WD 4TB Elements Desktop Hard Drive for near $100 is enticing. If already own hard drives, a docking station is great, Inateck in image above also copies an entire volume with a push of a button and can accommodate either regular (3.5") or laptop (2.5") hard drives - was invaluable when switched over to SSD in my laptop, push in two drives, press copy, done.
If looking for volume, buying anew, a WD 4TB Elements Desktop Hard Drive for near $100 is enticing. If already own hard drives, a docking station is great, Inateck in image above also copies an entire volume with a push of a button and can accommodate either regular (3.5") or laptop (2.5") hard drives - was invaluable when switched over to SSD in my laptop, push in two drives, press copy, done.
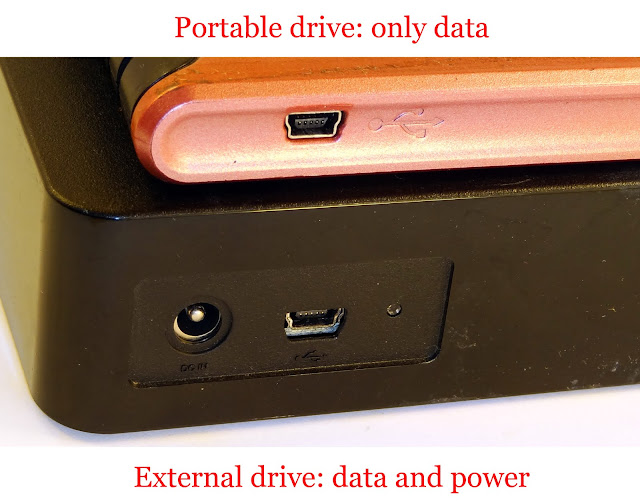
"Portable" drives do not have external power, sucking power from host computer, a Pi 3 can't really handle that. Check product description or images whether drive got one or two holes on the side, if only one (= only data), not good.
![]()
Sidenote: Even a Pi 2 can handle a 320 GB portable drive pulling duty as a Torrentbox, but same Raspberry can't handle an added RTL-SDR receiver or a portable drive above 500 GB - simply not enough power coming from the Pi.
Sidenote: Even a Pi 2 can handle a 320 GB portable drive pulling duty as a Torrentbox, but same Raspberry can't handle an added RTL-SDR receiver or a portable drive above 500 GB - simply not enough power coming from the Pi.
Want reliability, portability, versatility and speed? Flash drives are the best, but expensive in comparison, same money for less than 10% capacity versus a powered external hard drive. SanDisk Ultra Flair 64 GB USB 3.0 Flash Drive in image above, because 1) monster volume big drives are not supposed to spin for a few Gigabytes as decreases lifespan, and 2) thumb / flash drives are no hassle and incredibly versatile, portability means swapping between smart TV / phone / computer takes a few seconds if necessary.
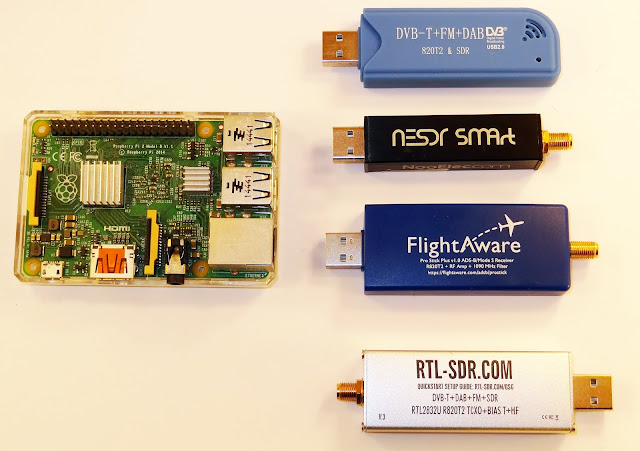
ADS-B receiver: All reasonable choices are below $30, get a Nooelec SMArt Bundle for $26 (review, Amazon) for ease of use form factor, warranty and quality. All other dongles require an USB extension cable because they're too wide, blocking nearby USB ports on a Raspberry.
![]()
Cheapest RTL-SDRs are generic dongles for less than $10, don't pay more. Any FlightAware Pro Stick (orange review, blue Pro review, Amazon) will be best value for money for performance (if available, hardcore nerds buy them up) with a homemade Coketenna. An rtl-sdr.com v.3 bundle is the most technologically advanced (review, Amazon) RTL-SDR receiver with an excellent antenna pack, good investment. More ADS-B receiver comparison here.
Cheapest RTL-SDRs are generic dongles for less than $10, don't pay more. Any FlightAware Pro Stick (orange review, blue Pro review, Amazon) will be best value for money for performance (if available, hardcore nerds buy them up) with a homemade Coketenna. An rtl-sdr.com v.3 bundle is the most technologically advanced (review, Amazon) RTL-SDR receiver with an excellent antenna pack, good investment. More ADS-B receiver comparison here.
microSD cards: same type which go into smartphones / tablets, minimum 8 GB, Sandisk Ultras (red over silver) are double speed versus noname for 2-3 dollars more, half time staring at screen.
Ethernet cable: also called RJ45, connects Pi 3 to WiFi modem, two hand movements, two clicks, done. Costs a few dollars on Amazon depending on length, e.g. 20 feet for $5, or off the shelf in any supermarket. Yes, Pi 3 has wireless built-in, skip this part if have a monitor, keyboard, and HDMI cable, and want to fiddle around - an Ethernet cable is the easiest and most reliable choice.
Optional: powered USB hubs draw power from the wall socket, not from the Pi 3, and recommended if connecting portable drives or using more than one external hard drive. Cheap ones without external power cost up to $10 (e.g. left one, one cable), a 7-port USB 3.0 (right one) with power is $30 (two cables, data and power).
![]()
Personal note re equipment: just buy the best you can afford, money is long forgotten when gear will still function years down the line.
Ethernet cable: also called RJ45, connects Pi 3 to WiFi modem, two hand movements, two clicks, done. Costs a few dollars on Amazon depending on length, e.g. 20 feet for $5, or off the shelf in any supermarket. Yes, Pi 3 has wireless built-in, skip this part if have a monitor, keyboard, and HDMI cable, and want to fiddle around - an Ethernet cable is the easiest and most reliable choice.
Optional: powered USB hubs draw power from the wall socket, not from the Pi 3, and recommended if connecting portable drives or using more than one external hard drive. Cheap ones without external power cost up to $10 (e.g. left one, one cable), a 7-port USB 3.0 (right one) with power is $30 (two cables, data and power).

Personal note re equipment: just buy the best you can afford, money is long forgotten when gear will still function years down the line.
Software
Tutorial below assumes you use a Windows 7 operating system like most visitors do, concept will be the same for the minority, tried installation steps with Android smartphone and tablets, works. I got no Mac so can't elaborate.
Download software below before starting workflow into one folder, you might have some of them already, my choices are below.
Raspbian: operating system for the Pi 3, start downloading Raspbian Stretch Desktop now.
Extracting files: 7-Zip for Windows, direct download link.
microSD card writer: Win32 DiskImager, green button top left, download starts in a few seconds.
Remote connection: Putty for Windows, direct download link, or search your app store for "SSH software" if on tablet / smartphone.
Network IP finder: Advanced IP Scanner for Windows, Fing for Android. Or search for "network analyser" in your app store.
In short: install software, use those software to control a Raspberry Pi 3 remotely, adjust, be merry. If you can use a computer without a nurse's help you're more than capable. In case you wonder, the official Pi 3 installation steps are pretty much the same but with less detail.
Bit longer: write latest Raspbian to microSD card, add support to connect remotely, plug in external drive and microSD card, power on, update, enable user rights, add Samba so Windows can see Pi 3, add Transmission for torrents, add FlightAware for ADS-B, happy days.
0) Download operating software for Pi 3 from here.
1) Install all necessary software, again: file extraction software, Win32Disk Imager, remote connection (Putty) and network analyser.
2) Once over the initial steps, open this guide and Putty window side by side, like this:
![]()
3) Made the guide with as little typing as possible using a mouse as well.
On an English American keyboard, "Enter" means the big button in the middle, "Y" means the letter Y, PageUp and Page Down are buttons on the right side, text written on them, "arrows" mean, well, arrows, backslash is \\ and forward slash is // (left and right of a keyboard in row above space, which is the longest key, one at the bottom). Writing SHIFT+ means press and hold down the Shift button and press the letter after the plus, like asterix is ****, SHIFT+8. Word "delete" means the Delete key, above arrows, up movement with right hand, deletes symbol under green square, Backspace deletes symbol to left of green square.
Do not use keyboard on right for numbers, use numbers above letters, funny things can happen in a Linux editor. Sign of """" is SHIFT+2, anything else you need on a weird French / whatever keyboard please look down, will be there.
5) Pay attention. Pi 3 will do exactly what you tell it to do, mistakenly type one more dot such as 192.168.0..3, or writing Pi instead of pi and it's head-scratching time.
Download Raspberry Pi 3 operating system if not already done so, go for the torrent if you got a Torrent client as it's faster, get the following file:
![]()
Right-click, extract with 7-ZIP:
![]()
Resulting file needs to be written to microSD card, so insert microSD card with adapter into computer, then start Win32DiskImager.
![]()
Check name of drive in file explorer, then select Raspbian image (file you've just extracted) in Win32DiskImager, double-check correct device name, then click Write, Yes, Yes:
![]()
Optional and recommended for new drives: in the meantime, if just bought a flash/external hard drive, plug it in, will show up in File Explorer, format it with Quick format, type shall be NTFS (Pi 3 / smartphone / tablet / smart TV will instantly see it).
![]()
![]()
In file explorer, on the microSD card, create a text document called ssh:
![]()
Note: if Windows moans that disk is write-protected, slide the little switch (top left) in the other direction on the microSD card adapter.
Safely Remove Hardware, green icon next to clock, usually bottom right of screen:
![]()
Insert microSD card into Pi 3, plug in Ethernet cable (make sure other end is securely into home WiFi modem, hear a click), external hard drive, RTL-SDR dongle:
![]()
Sidenote: blue USB port in image above is for an external hard drive to get NAS without all this programming, but that's limited functionality compared to a Pi 3 setup with Torrentbox and ADS-B.
Power on Raspberry, wait two minutes, get a network analyser out, Pi 3 will show up on your local / home network, Advanced IP Scanner on Windows:
![]()
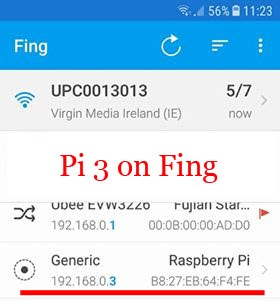
Fing on Android:
![]()
Write down this IP address, will be required later on, or write it on Pi, makes identification easier. In this tutorial, I'll use 192.168.0.3 just like in image above.
Start up Putty, enter IP address of Pi, press Enter:
![]()
Say Yes to Warning message:
![]()
Enter pi as login name, press Enter, and raspberry as password, press Enter - password will not show up when you type, that's normal:
![]()
Success, you're remotely connected to a Raspberry Pi 3! Well done, anything from now on is just copy-paste and some typing.
Geek notes: process above is exactly the same as if installing any .img based operating system, called "flashing" in Linux lingo to confuse new users. Safely Removing Hardware is well advised. Any smartphone/tablet based network analyser will be faster to install and get Pi 3's address than a Windows counterpart, once known, tends to stay the same.
Commands do not start with bold letter such as this line and always in separate line to make it easier what you need to easily copy-paste.
Start with:
Extracting files: 7-Zip for Windows, direct download link.
microSD card writer: Win32 DiskImager, green button top left, download starts in a few seconds.
Remote connection: Putty for Windows, direct download link, or search your app store for "SSH software" if on tablet / smartphone.
Network IP finder: Advanced IP Scanner for Windows, Fing for Android. Or search for "network analyser" in your app store.
What we gonna do
In short: install software, use those software to control a Raspberry Pi 3 remotely, adjust, be merry. If you can use a computer without a nurse's help you're more than capable. In case you wonder, the official Pi 3 installation steps are pretty much the same but with less detail.
Bit longer: write latest Raspbian to microSD card, add support to connect remotely, plug in external drive and microSD card, power on, update, enable user rights, add Samba so Windows can see Pi 3, add Transmission for torrents, add FlightAware for ADS-B, happy days.
How to use this guide without hassle
0) Download operating software for Pi 3 from here.
1) Install all necessary software, again: file extraction software, Win32Disk Imager, remote connection (Putty) and network analyser.
2) Once over the initial steps, open this guide and Putty window side by side, like this:

3) Made the guide with as little typing as possible using a mouse as well.
Copy-Paste: once used it you'll know what to do, but to be on the safe side: with mouse, highlight commands, that is text with space above and below in this guide, left click and hold to select text, then right click once, Copy from menu appearing, then left-click in Putty window, which makes it active, green square outline turns into green filled in square, then one right click with mouse to paste command copied, press Enter. This sounds complicated when reading it, do it twice, comes second nature then.
4) Look at keyboard, we gonna be using a working environment where you control Pi 3 with a keyboard, this is called command line environment.On an English American keyboard, "Enter" means the big button in the middle, "Y" means the letter Y, PageUp and Page Down are buttons on the right side, text written on them, "arrows" mean, well, arrows, backslash is \\ and forward slash is // (left and right of a keyboard in row above space, which is the longest key, one at the bottom). Writing SHIFT+ means press and hold down the Shift button and press the letter after the plus, like asterix is ****, SHIFT+8. Word "delete" means the Delete key, above arrows, up movement with right hand, deletes symbol under green square, Backspace deletes symbol to left of green square.
Do not use keyboard on right for numbers, use numbers above letters, funny things can happen in a Linux editor. Sign of """" is SHIFT+2, anything else you need on a weird French / whatever keyboard please look down, will be there.
5) Pay attention. Pi 3 will do exactly what you tell it to do, mistakenly type one more dot such as 192.168.0..3, or writing Pi instead of pi and it's head-scratching time.
Getting the Pi 3 up and running
Download Raspberry Pi 3 operating system if not already done so, go for the torrent if you got a Torrent client as it's faster, get the following file:

Right-click, extract with 7-ZIP:

Resulting file needs to be written to microSD card, so insert microSD card with adapter into computer, then start Win32DiskImager.

Check name of drive in file explorer, then select Raspbian image (file you've just extracted) in Win32DiskImager, double-check correct device name, then click Write, Yes, Yes:

Optional and recommended for new drives: in the meantime, if just bought a flash/external hard drive, plug it in, will show up in File Explorer, format it with Quick format, type shall be NTFS (Pi 3 / smartphone / tablet / smart TV will instantly see it).

Back to installing Pi 3: when card writing successfull, DO NOT remove the micro SD card.

In file explorer, on the microSD card, create a text document called ssh:

Note: if Windows moans that disk is write-protected, slide the little switch (top left) in the other direction on the microSD card adapter.
Safely Remove Hardware, green icon next to clock, usually bottom right of screen:

Insert microSD card into Pi 3, plug in Ethernet cable (make sure other end is securely into home WiFi modem, hear a click), external hard drive, RTL-SDR dongle:

Sidenote: blue USB port in image above is for an external hard drive to get NAS without all this programming, but that's limited functionality compared to a Pi 3 setup with Torrentbox and ADS-B.
Power on Raspberry, wait two minutes, get a network analyser out, Pi 3 will show up on your local / home network, Advanced IP Scanner on Windows:

Fing on Android:
Write down this IP address, will be required later on, or write it on Pi, makes identification easier. In this tutorial, I'll use 192.168.0.3 just like in image above.
Start up Putty, enter IP address of Pi, press Enter:

Say Yes to Warning message:

Enter pi as login name, press Enter, and raspberry as password, press Enter - password will not show up when you type, that's normal:

Success, you're remotely connected to a Raspberry Pi 3! Well done, anything from now on is just copy-paste and some typing.
Geek notes: process above is exactly the same as if installing any .img based operating system, called "flashing" in Linux lingo to confuse new users. Safely Removing Hardware is well advised. Any smartphone/tablet based network analyser will be faster to install and get Pi 3's address than a Windows counterpart, once known, tends to stay the same.
NAS / Network Attached Storage commands
Commands do not start with bold letter such as this line and always in separate line to make it easier what you need to easily copy-paste.
Start with:
sudo apt-get update -y && sudo apt-get upgrade -y && sudo apt-get install ntfs-3g -y
Pi 3 works away for a few minutes, like 5 or 10 depending on Internet connection speed, white text scrolls on black screen:
![]()
That’s normal, wait patiently, all in order - this is the moment you'll start feeling "I got this, yeah!"
Next:

That’s normal, wait patiently, all in order - this is the moment you'll start feeling "I got this, yeah!"
Next:
sudo blkid
Check name of external drive, bottom white line in image below:

Can be sda, sda1, sd2, starts with sd, adjust commands below accordingly, sda and sda1 is the most common; I use sda in commands below so you only have to enter the number 1 or 2 if sda1 or sda2 etc. Again, use numbers above letters on keyboard, not the numerical keypad on the right.
Directory name will be "changethis" in this tutorial, or whatever you fancy, must be same later on, so don’t choose KimsExternalLittlePonyFlashDrive unless fond of typing.
Again, external drive is named "changethis" for simplicity, if you see changethis or sda in commands below please adjust: copy-paste command, then navigate to part with left or right arrows, delete with Delete key, enter numbers with numbers above keyboard.
Copy-paste the following:
Copy-paste the following:
sudo mkdir /changethis && sudo chown -R pi:pi /changethis && sudo chmod -R 775 /changethis && sudo umount /dev/sda && sudo mount -o uid=pi,gid=pi /dev/sda /changethis
I always get the message that the disk contains an unclean file system, Pi 3 takes care of it in less than 30 seconds.
![]()

Check whether the external drive is mounted (it will be) and if so, into what directory:
df -h
Nearly there, external hard drive is mounted to directory, see bottom white line in image below:

Automatically mount the disk upon restart:
sudo nano /etc/fstab
Black on white text editor with lines comes up, left click in Putty window, then use down arrow on keyboard to go to bottom.
Copy-paste the following, repeat, adjust sda and changethis as necessary,
/dev/sda /changethis ntfs rw,nosuid,nodev,default_permissions 0 0
CTRL+X,“Y”, Enter, back to black screen with green.
Happy days, external drive is mounted successfully!
Geek notes: Boolean operators && used in commands above to simplify steps; -y to prevent pressing "Y" and Enter unnecessarily. If installing more than one hard drives, firing up a text editor and replacing sda with actual reference and changethis with desired name means less typing. Yepp, that matters with multiple drives, copy-pasting this paragraph into a text editor, then Replace command in Word saves lot of time.
SAMBA
That’s for Windows to see the Pi 3 and to talk to each other.
Start with:
sudo apt-get install samba samba-common-bin -y && sudo chown -R pi:pi /changethis && sudo nano /etc/samba/smb.conf
Pi 3 works away for a few minutes, then:
Text editor opens up, lots of text on screen, repeatedly press Page Down key to go to bottom, copy-paste the following there:
[Changethis]
comment = changethis
browseable = yes
path = /changethis
writeable = Yes
create mask = 0777
directory mask = 0777
browseable = Yes
public = yes
Screenshot:

CTRL+X, “Y”, Enter, back to green on black, next command:
sudo /etc/init.d/samba restart
Screenshot after command:

Part Two complete, Pi 3 shows up in Windows under Network:

Geek notes: [changethis] will be name on Windows of external hard drive; if using more than one drive, adjust this name to represent the actual drive, see notes later.
path = /changethis refers to drive mounting location, if different from /changethis with two or more drives, adjust.
Transmission
Torrenting server software, same as uTorrent or any other torrent client. It's a service to the community to share the Pi 3 operating system if you got an Internet-connected Raspberry.
Install:
sudo apt-get install transmission-daemon transmission-cli -y && sudo service transmission-daemon stop && sudo mkdir -p /etc/systemd/system/transmission-daemon.service.d && sudo nano /etc/systemd/system/transmission-daemon.service.d/local.conf
Text editor opens up, blank black screen, copy-paste the following:
[Service]
ExecStart=
ExecStart=/usr/bin/transmission-daemon -f --log-error -g /etc/transmission-daemon
[Service]
ExecStart=
ExecStart=/usr/bin/transmission-daemon -f --log-error -g /etc/transmission-daemon
Ctrl+X,” Y” and Enter to go back to command prompt, then:
sudo systemctl daemon-reload && sudo service transmission-daemon stop && sudo usermod -aG pi debian-transmission && sudo usermod -aG debian-transmission pi && sudo chmod 775 /etc/transmission-daemon/settings.json
Then:
sudo service transmission-daemon stop
Then:
sudo nano /etc/transmission-daemon/settings.json
Text editor opens up instantly with blue (settings name), green (what you change) and pink text (also changeable, inbetween quotation marks, that’s the """" symbol, Shift+2 on an English keyboard). The star **** is Shift+8 if you need it.
Text is in alphabetical order, if familiar with torrenting, you’ll know what’s seeding so you can adjust accordingly, if not, leave everything as it is and only change the following, move cursor with arrows:
“download-dir” change to “/changethis” (or whatever name / mount point you gave to the external drive).
“rpc-whitelist-enabled”: change to false, text turns green, any computer can connect to Pi 3.
"umask": change from 18 to 002, use numbers above letters on keyboard.
Finished unless you wanna do more changes, but only if you have a remote clue what’s a seed queue.
Then the usual by now: Ctrl+X, “Y” and Enter, then:
sudo service transmission-daemon restart
Enter the Pi’s address in a browser on a Windows, followed by :9091, like 192.168.0.3:9091, get Transmission's web interface.
Put mouse over icons and read what they mean, load a torrent from the folder icon top left corner of screen: download, then add the Raspbian torrent from official webpage, Transmission browser will look like this:
More info on Transmission on the official page.
Geek notes: no authentication required to access Pi 3, so no hassle entering passwords users are likely to forget. Stopping transmission before editing settings is absolutely necessary, therefore added separate lines, then restart service.
Add ADS-B capability
Steps exactly as per the official FlightAware page, parts of my guide for setting up an ADS-B station should be relevant for new users.
Combining all steps into one command to save back-and forth between guide and Putty:
Combining all steps into one command to save back-and forth between guide and Putty:
sudo wget http://flightaware.com/adsb/piaware/files/packages/pool/piaware/p/piaware-support/piaware-repository_3.5.3_all.deb && sudo dpkg -i piaware-repository_3.5.3_all.deb && sudo apt-get update -y && sudo apt-get install piaware -y && sudo piaware-config allow-auto-updates yes && sudo piaware-config allow-manual-updates yes && sudo apt-get install dump1090-fa -y
It takes minutes for FlightAware to recognize you added a new station, register in that time, go to Claim a station, see that all is well:
![]()
Station will show up in your control panel in about 15 minutes, on any connected device, go to Pi 3 address and :8080, such as 192.168.0.3:8080 to see aircraft:
![]()
Once done, it's a good idea to feed other suppliers, tutorial here.

Station will show up in your control panel in about 15 minutes, on any connected device, go to Pi 3 address and :8080, such as 192.168.0.3:8080 to see aircraft:

Once done, it's a good idea to feed other suppliers, tutorial here.
Performance
Ran installation steps and commands above over, over and over again, tested on a Raspberry Pi 2 and four Pi 3s, with 5 microSD cards and four external drives featured in this tutorial, worked every time.
Social: great when friends or relatives come over, can share my files and videos after providing WiFi password, and they can also upload their files. On Android, File Manager works well for file transfer, VLC Media Player sees network drive and can play video of my dog attacking a tree stump. Simply having a network drive where all family / buddies can upload files is priceless, easier than searching for cables.
Watching videos: 720p HD videos from Pi 3 external drive can be played without lagging over WiFi on a computer, smartphone and tablet.
Torrenting: seeded 20 torrents worth 58 GB whilst watching a 720p home video without lagging.
ADS-B: performance will depend on receiver and antenna plus a host of other factors, didn't seem to really affect other operations / services.
Not all at the same time: disk use is the bottleneck, e.g. backing up files from a smartphone to external Pi 3 drive and trying to add 10 torrents via Transmission interface = browser becomes unresponsive, if watching a video it will start to freeze up. Once Pi 3 catches up, you can do one thing at a time.
Renaming drive
Mounting point names (which folder Pi 3 thinks is the hard drive, reason I chose changethis as variable) should be preferably adjusted for sanity, Samba name [changethis] better represent capacity and/or any easy to remember identification aid.
Renaming a hard drive for easier identification can be done by stopping samba service with:
sudo /etc/init.d/samba stop
Then edit the bottom of smb.conf file (press Page Down repeatedly) and change names:
sudo nano /etc/samba/smb.conf
Save your work: CTRL+X, Y, Enter, then restart service:
sudo /etc/init.d/samba restart
Screenshot:


Adding more hard drives
Pi 3 can handle more than one external drive as long as they do not draw too much power; consequently I added one more 64GB Flash Drive:

Just plug drive into the Pi 3, no need to power off, then:
df -h
Second drive is seen by the Pi 3 instantly:

However, I'm not happy with the access path (letters and numbers next to 47%), so repeat steps above by adjusting sda to sdb1 and changethis to whatever you want, I chose top:

Change Samba name as well, 3 minutes later 2nd drive shows up as a Network Attached Storage in Windows:

Or on Android (with File Manager app):

Continue adding external drives if you wish, but remember, Pi 3 can't really handle portable drives so use a powered hub, or a powered external drive.
Read more to know why and how commands work
Indebted and used information from the following websites, full credit:
Decreasing GPU memory for headless server setup: https://haydenjames.io/raspberry-pi-3-overclock/
Transmission guide: https://www.htpcguides.com/install-transmission-bittorrent-client-on-ubuntu-15-x/
Personal final note: freely admit to knowing nothing in comparison to some readers when it comes to Linux / Pi 3 permission levels, user authentication, and many more I'm probably unaware of. Simply put, I wanted a NAS / Torrentbox / ADS-B server, and existing guides were either outdated, way too complicated for new users, did not contain sufficient information or required endless attention. I'd be delighted if Linux or Pi 3 gurus wrote in how to make this tutorial better for the end user, nameless or full credit given as always.
Wanna help out if you know more? Comment below.
Wanna help out if you know more? Comment below.